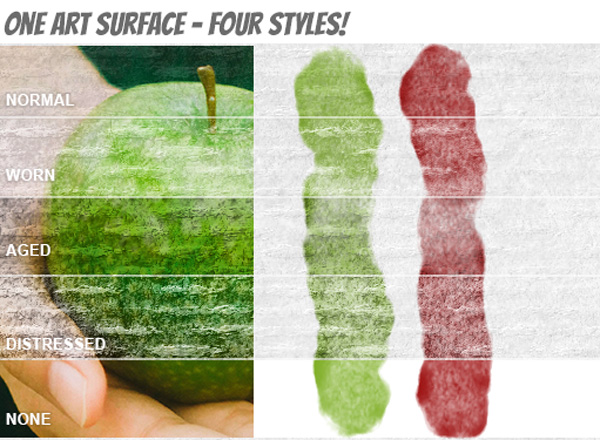
Art Surfaces are simply Photoshop templates that apply lighting and shading to your artwork as you draw or paint to make it appear that you painted or drew on the paper, canvas or board itself. Ink appears to soak in, light catches the raised areas while the texture below shows itself.
I gave away this prototype for free to Newsletter Subscribers in newsletter #10. Art Brushes Members can download it on the Photoshop freebies page.
How do I use them in Photoshop?
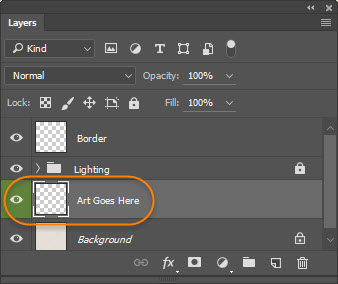
Just draw, paint or paste your artwork onto the green layer and the template does the rest.

This video will show you the main features in less than 3 minutes
I Want Them! Where can I get them?
You can buy the GrutBrushes Art Surfaces Smart Paper textures for Photoshop here or the Art Surfaces Volume 1 for Procreate here
Where Do I Select the Presets for the different ‘looks’?
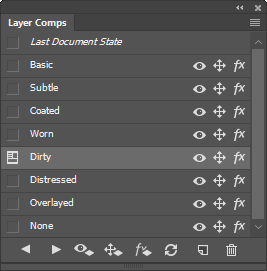
Some of the Art Surfaces will have 3 to 10 presets that allow you to instantly apply a ‘look’ like a weathered or worn look or add dirt to the surface. These effects are all non-destructive and can be removed by changing the preset.

These will be found in the Layer Comps Panel (Window > Layer Comps)

Be aware that when you switch looks, any new layers you created since opening the Art Surface will need to be made visible again by clicking on the eye next to the layer. The look will be applied to the green “Artwork” layer and everything you paint on.
I Need a Print Resolution Art Surface
The Art Surfaces all scale and can be tiled seamlessly. Just grab the crop tool and stretch it outside the boundaries of your canvas to enlarge it to any size you want. Even the best seamless tile will eventually show a pattern, but you will probably be surprised by how much you can get away with on most of these. Watch this video to see me scaling this Art Surface to 19 X 29 inches at 200 dpi.
The amazing thing about these templates is you can always go back and expand your canvas size with the crop tool by dragging outside the borders!
I need more Detail! How do I get the Magnified Paper look?
Just scale the image up (Image > Image Size Alt+Ctrl+I) and crop your canvas to the size you need. Keep in mind that these are amazing but not magic. You will eventually lose resolution and your image will get fuzzy if you enlarge it too much but most should be able to handle up to 200%.
How Do I Apply This to My Previous Artwork?
Just paste anything into the green layer… your old paintings, logos and even photos and you can apply any of the presets. Keep in mind that it’s a lot like real life, and pasting a Photo onto a piece of cardboard isn’t necessarily going to make your photo look like cardboard.
[baslider name=”oilsurfacesketch”]